
Wednesday, September 25, 2013

Tuesday, September 24, 2013

Monday, September 23, 2013


Sunday, September 22, 2013

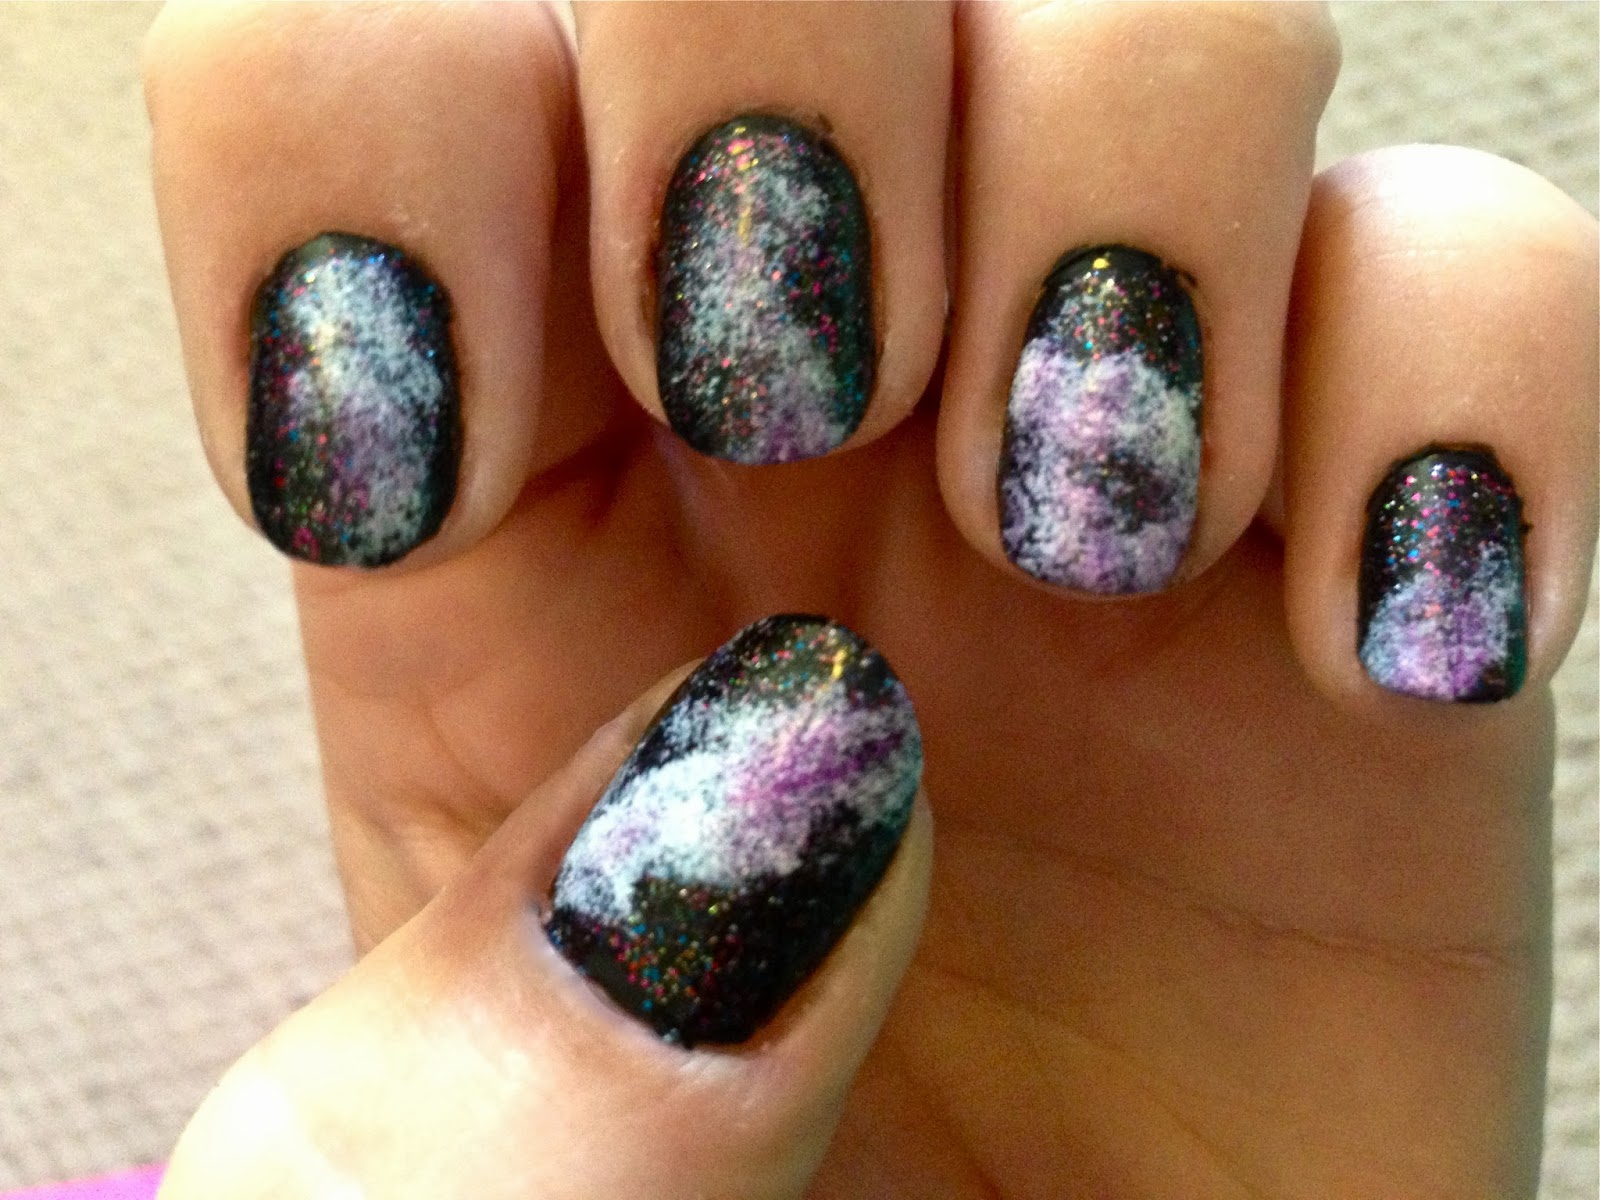
out of this world

Varnish Vixen lives!
Hello to my old followers, and to my new. So sorry for the long wait, but we're back and here to stay. This post and the next few are catch-me-ups from the last few months, so while the trends and reviews may be a little late I wanted to include them all the same--back to the new stuff real soon!
This look hopefully looks "out of this world" to you as it was intended. I designed this for my dorm's much anticipated spring dance of the exact theme. Being an RA I had the privilege of chaperoning and the lack of time/interest in developing a costume so opted for comfort in black yoga pants and a top and went as a black hole. At least I had the decency to do my nails for the occasion right?
I previously did galaxy nails back when I was living in London (check out the tutorial here) but I found a different and honestly easier method that I applied for this occasion. Here is my modified tutorial for galaxy nails!

- Start with one coat of nail foundation. As usual, I started with a coat of butter LODNON Nail Foundation Flawless Basecoat.
- Apply two coats of a high glitter, black base coat. I chose butter LONDON's The Black Knight because the pink, blue, purple, and silver glitter stand out great against the black--like stars!
- Paint some white nail polish, I used O.P.I.'s Alpine Snow, on the corner of a makeup brush so it is fairly saturated. Feel free to test dab it a little on some paper to get a sponging look you are pleased with.
- Lightly dab the white on each nail in varying clusters using the sponge.
- On a different corner of the sponge paint an accent color for the galaxy. I chose a royal purple, butter LONDON's HRH, to compliment the glitter in the basecoat.
- Dab the accent color sparingly overtop the white on each nail either in select spots or over the majority of the white--it's up to you.
- Using a detail brush or toothpick and your white polish, paint dots sparingly on each nail to distinguish some bigger stars.
- To add a little something extra to the galaxy paint overtop of it with a multicolored glitter flake polish. I used China Glaze's Luxe and Lush from the Hunger Games Collection.
- After waiting about 5 minutes, paint one coat of topcoat over each nail and let dry for about 20 minutes. As always, I used Seche Vite topcoat to seal the design in a glossy finish.

I really liked the look of this design--it felt much much more in synch with the traditional galaxy pattern seen on clothing and accessories at the time. Overall, it's a pretty easy design to pull off and offers a lot of design flexibility with colors, topcoats and style. Have you tried galaxy nails? What do you think?


 |
| The Black Knight Alpine Snow HRH Luxe and Luxe and Lush |
Thursday, September 19, 2013
now you see me...

It's that time of year...A/W 2013/14 Runway is here. For the next few weeks I will be recreating runway manicures, and creating designs inspired by the fashions walking down the catwalks at NYFW and LFW. This look was inspired by the Michael Kors collection. His show featured bold colors like orange, cobalt, and yellow color blocked in contrast to the significant amount of black shown on his runway. Leather, mink, houndstooth and camouflage took on a modern appeal and definitely made a statement at NYFW. Michael Kors described his show best when he said:
“BRIGHT LIGHTS, FAST CITY… URBAN ATHLETICISM MEETS UPTOWN POLISH… AN ATTITUDE BASED ON SPEED, ENDURANCE AND GLAMOUR…ELECTRIC COLORS FROM NEON ORANGE, TAXICAB YELLOW AND ROYAL JUXTAPOSED WITH BLACK, WHITE, OLIVE AND CHARCOAL…A LUXE TAKE ON CAMO AND GRAPHIC DOGSTOOTH CHECK… HEAT-SEALED CLOSURES, MOTO TAILORING, PERFORATION AND QUILTING EQUAL HIGH PERFORMANCE CHIC…GLEAMING METALLIC ACCENTS ON SLEEK STRUCTURED BAGS, STREAMLINED PUMPS AND BOLD BELTS…THE OVERSIZED GOGGLE…THE GLOVED HAND… URBANE SPORTIF…”

To best translate the look of Michael Kors' show, I decided to emulate the cobalt, grey, black and white camo print shown in both a pant suit and a stunning mink coat. Because the camo is a little loud, especially in my choice color palette, I wanted to break it up by doing an all black nail on my ring finger. This also helped to tie in the use of shiny black leather and patent from the runway show with the camo print I had planned on each nail.
For this look, I started with butter LONDON's Nail Foundation Flawless Basecoat. I decided to use white as my base color for the nails with the camo print so the other colors would show up well. I painted two coats of O.P.I.'s Alpine Snow on all but the ring finger. Next, using butter LONDON's Union Jack Black, I painted the ring finger and added my first round of camo print on all the white nails. While this initially looked like cow print, I had faith it would turn out alright.


The closest shade of polish I had to the grey in Michael Kors' line was butter LONDON's Chimney Sweep. It was a bit darker and slightly more glittery, than I would have liked, but it made an effective second


As a finishing touch, I really wanted to make the black on the ring finger and in the camo print stand out, as to imitate the leather/patent on the runway. I decided to paint all the camo print nails with my matte topcoat, Essie's Matte About You. Next I painted the ring finger with one coat of my ultra shiny SV Topcoat. Then on the camo print, I carefully painted over the black parts of the camo using a skinny brush and SV Topcoat. This way, the black popped on the print and tied into the patent/leather ring finger.


What do you think of this look? Are you a fan of the Michael Kors A/W 2012/13 runway collection?
 |
| Alpine Snow Union Jack Black Chimney Sweep Mesmerize |
 |
| Seche Vite Esse's Matte About You |
pretty in pastels

Being that it is currently 9 degrees and the snow is falling, it is hard to think of spring as being right around the corner. Well in the fashion world, seasons always come early, so I am lucky enough to bring you the fabulous Spring 2013 collection from butter LONDON.
This collection is all about pastels...think easter, macaroons, sweethearts candies, and everything spring! According to Katie Hughes, butter LONDON Global Colour Ambassador, “Pops of pastels are iconic for spring and look like candy on the nails.” This seasons catwalks were flooded with pastels--from the structured dresses in Chloe and Givenchy's shows to the flowing pieces in Eli Saab and Alexis Mabille's, the three dimensional florals of Christian Dior and Giambattista Valli, to the pattern of Erdem and Antonio Marras.


As you can see the beautiful Spring 2013 shades coordinated fabulously with a number of designers collections for this season. So without further ado...

Kerfluffle Jasper Molly Coddled Fruit Machine Fiver Cuppa

A beautiful peachy coral créme lacquer.

Jasper
A cheerful soft yellow crème polish.

Molly Coddled
A peppy lavender orchid shade of an opaque créme formula.

Fruit Machine
This bright bubble gum pink créme polish definitely gives your look a punch!

Fiver
Talk about stunning....this icy mint créme shade is sure to turn heads.

Cuppa
This toasted neutral tan créme shade looks fabulous on, even with my lighter skin tone.
All six of the polishes in the collection are of exceptional quality. Anyone who reads my blog knows I adore butter LONDON products for their lack of harsh chemicals and beautiful application, but this collection in particular had a fantastic formula. All of the créme shades go on quite smooth and while acceptably opaque with just one coat, I always prefer two for a more full coverage. Any of these shades would make for a perfect addition to one's spring wardrobe.
Not only are these shades fabulous on their own... but they also make for some really fun combinations!
I did the following two designs after getting my first three of the six lacquers (Molly Coddled, Fruit Machine, and Cuppa). I love the contrast of the peppy pastels with the neutral Cuppa. The first design is actually one of my favorites, despite its simplicity. The polka dot one, was just for fun!
Design 1:

Design 2:

What do you think of the butter LODNON Spring Collection?
goop

One of the lovely holiday gifts I got from my sister was this butter LONDON lacquer set from goop. For those of you unfamiliar with goop, it's a lifestyle website created by Gwenyth Paltrow that features weekly articles and collaboration products. This limited edition set of butter LONDON shades was created exclusively for the site and only available for a short time. When I got the announcement about the collection and had a chance to get a glimpse of the shades I just knew I had to have it. Unfortunately my polish budget was nonexistent so I had to put in an emergency Christmas order with my sister. Was I ever happy to open this up Christmas morning and see that she came through. All three colors, aside from having fabulous names, look stunning on. Here's a peek:

Hampstead Heath: a mossy green and gold glitter.

Abso-bloody-lutely: Tell me this sassy name doesn't say it all. This deep blood red is so on point this season.

Bread & Butter Pudding: I may have a new favorite neutral here. This natural ivory cream polish is the perfect polish for a minimalist look.
ribbons and bows


Wishing you a marvelous end to 2012.
xoxo
 |
| Cream Tea Saucy Jack West End Wonderland |
dash away all


Merry Christmas!

Santa certainly made a stop at our house last night. Per usual the kids (that includes my 19-year-old sister) were up and ready to go at 6:50 am which meant there was no sleeping in for me. I kindly kept the kids at bay until 8 when I let them wake up all the parents so we could start opening presents. It was definitely a good year with some of the favorites being iPad mini's and for me... lots of nail polish!


This yuletide look was inspired by the book we read every Christmas Eve... The Night Before Christmas. So, on my nails we have the big man followed by Dasher, Dancer, Prancer, and Vixen (note the eyelashes). And on the right, Comet, Cupid, Donner, Blitzen, and Rudolph the red nosed reindeer. As I did on the last few designs, I started with one coat of butter LONDON Nail Foundation Flawless Basecoat and two coats of Cream Tea. Next using Teetotal, I painted the shape of the reindeer faces on the 9 nails. Again using Cream Tea, I painted the eyes on each deer and the antlers with La Moss. On Rudolph I used Chancer to give him his signature shiny red nose. Next I used my staple polish, Union Jack Black to outline all the reindeer. For Santa, I used a bit of my Nail Foundation to get the natural skin color. Next using Come to Bed Red, I painted his hat, later adding a bit of glitter with Chancer. I then added a little bit of Cream Tea for the fur on his hat and his snow white beard. To define his face I used Union Jack Black to outline. I finished it off with one coat of OPI Topcoat.
Wishing you and yours a very Merry Christmas!
 |
| Cream Tea Teetotal La Moss Union Jack Black Come to Bed Red Chancer Nail Foundation |
not the gumdrop buttons

 For this gingerbread house look I started with one coat of butter LONDON Nail Foundation Flawless Basecoat and one coat of China Glaze's Mahogany Magic. Using butter LONDON's Cream Tea, I painted the icing design on each finger (unfortunately--or fortunately i guess depending how you feel--the pointer, middle and pinky nails ended up looking a bit like hostess cupcakes). I embellished the ring finger and the gingerbread house on the thumb using some Holiday glitters from butter: Chancer, Swinger, Scallywag, and West End Wonderland. I painted one coat of O.P.I. topcoat to finish the look. Good enough to eat?